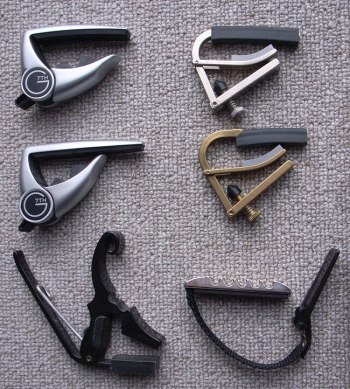
Before I can explain how to use a guitar capo let me just give you a quick example of what a guitar capo looks like. Here’s a picture presenting a set of different capos:

They look differently but they all have the same purpose. And that is to put one of them on the fretboard of your guitar and shorten the playable length of the strings.
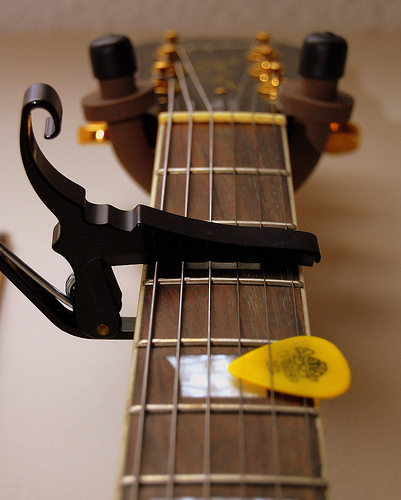
So for example, if you put it on the 3rd fret (like the image below) you’ll end up with all strings able to play sounds one and a half tone higher than normal.

In plain English, a guitar capo is very similar to a bar which you can do using your first finger, only a capo is permanent.
How to use a guitar capo
This is simple:
- Pick a fret and put the capo a little to the left of that fret.
- Clamp it tightly, put be careful not to damage the neck of your guitar.
- Make sure that the spacing between the strings is the same as it was without the capo.
- Strum every string to make sure that the sounds are clear and that there’s no buzzing.
Benefits of using a capo
So why would you want to do this? I mean what is the reason for placing a permanent bar on your fretboard?
One thing that’s worth realizing is that guitar is a complete instrument that lets you play a variety of different kinds of music, different sets, scales, and patterns. Not everything is played within the first 5 or 6 frets, even though it seems like that’s exactly the case when you’re just starting out.
Some arrangements force you to focus on the upper section of the fretboard, and playing there can be tricky due to the constant need of applying all those bars. In such a situation using a guitar capo makes your life a lot easier.
You can simply place it on a fret where you want to start your musical arrangement and then grab all the chords in relation to the capo’s position. Let me give you an example.
Here’s a demonstration of how to use a guitar capo while performing different variations of the G major chord. The standard version of the chord:

The chord consists of three empty sounds (strings D, G, and B) and three more sounds that require you to fret down the remaining strings. This is simple, right? Now let’s take a look at another version of the same G chord:

This time the chord starts on the 3rd fret where a bar needs to be placed. And the whole pattern reminds the F major chord, only two frets higher.
This version of the G major chord is much easier to play if you use a capo and place it on the 3rd fret across all the strings. Then the only thing you have to do is grab the remaining strings using a pattern just like in the E major chord, only three frets higher.
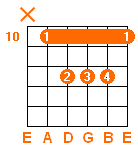
We can go even further with this and take a look at yet another version of the G major chord:

This time we start on the 10th fret. And again, it’s much easier to play it if you use a capo and place it on that 10th fret.
So I guess the ultimate benefit of using a guitar capo is that you get one extra finger to play with.
One disadvantage of using a guitar capo
There’s one main disadvantage. You can’t actually remove it (or put it on) quickly enough to do it in the middle of a song. Once it’s on it’s on, so you’re going to be playing with it until the song ends or until there’s a longer pause in the song.
Where you can get a capo
Simple answer – Amazon. I’ve prepared three options for you:
- $12.95 Dunlop 83 Trigger Curved Guitar Capo (Black)
- $8.79 Live For Music, Guitar Capo, K-Style by The Instrument Store
- $3.99 Kyser Pro/Am Guitar Capo
To be frank, every one of these should do just fine, but you still get what you pay for, so the cheapest option is not necessarily the best.
If you have any additional advice on how to use a guitar capo please feel free to shoot me a comment. Also, do you have a capo? How often do you use it?


Comments by Carlos
Learning Guitar – What Are the Possibilities
Good point, thanks. I will have to give it a ...
Getting To Know The Top 10 Most Famous Guitars
Apparently, Ultimate-Guitar.com readers didn't consider it being famous enough. You ...
Guitar Lessons: The Next Step Past Basics
I've started my adventure with classical guitar too. Cheers!
Learning the Basics of Guitar Theory
From my experience, the best way is to take a ...
Learn How to Play Guitar by Ear
Thanks for commenting, Olaf :)