 There have been two parts in this guitar string series so far. We begun by explaining how often should you change guitar strings, and then we talked about how to change acoustic guitar strings. This post is all about classical guitars and how to change classical guitar strings.
I’m sure you already know this but classical guitars are built a little differently than electric or acoustic guitars. Well, at least some elements of them are different. And these are exactly the elements we’re going to be playing with while changing strings.
First of all, the guitar’s head is different, and the tuning pegs – even though performing the standard operation – are built differently. Also the way strings are held on the bridge is different. So what does this mean when it comes to changing classical guitar strings?
Let’s get right into it.
You can remove all strings at once
This is something I wasn’t advising to do on an acoustic or electric guitar, but here you can remove all strings at once.
Strings meant for acoustic and electric guitars are entirely made out of different kinds of metal, and they end up producing a lot of tension on the guitar’s neck. Classical guitar string are only metal coated, and the core is actually made out of nylon. Also, the guitar itself is not so prone to deformation.
Removing the strings is very easy. All you have to do is uncoil the string from the tuning peg completely, and then unwrap it from the bridge.
I’m sure you’ve noticed a long time ago that classical guitar strings look exactly the same from both sides, so mounting them on the bridge can be challenging first couple of times you’re doing this.
Once all strings are off you can do some quick cleaning work (check this out: how to clean guitar) and start putting the new ones on.
How to change classical guitar strings
Start with the E6 string.
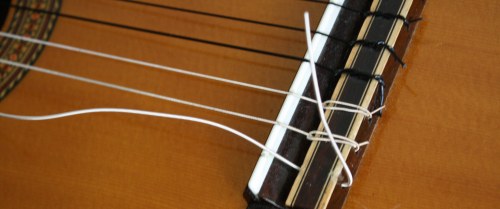
Take the string and slide one end of it into the hole in the bridge (image below).

Then create a little knot like the one on two images below.


Now it’s time to coil the string on the tuning peg.
- Start by pulling the string carefully up the fretboard.
- Slide the string through the tuning peg.
- Start tightening the string by turning the peg. Do it slowly and gently.
- Make sure that the string wraps around the tuning peg neatly – one wrap-around under the other. The wraps shouldn’t lie on top of each other, or cross over.
- Bring the string into tune by using a digital tuner. Then tune it one semitone higher. This will stretch the string a bit more so it will be able to keep its desired tune more quickly.
- Use wire cutters to get rid of the excess string.
The image below shows the complete product, so to speak.

Change all the other strings.
Simply repeat the process until you’re done with all six strings. And that is it, you’ve just learned how to change classical guitar strings.
When we were talking about acoustic guitar strings I told you that new strings don’t keep their tune that well. The case is even worse with classical guitar strings. You need to be patient and expect to tune your guitar every five minutes if you’ve just put on a new set of strings.
Good classical guitar strings
Make sure to invest in your strings. Cheap ones are often just annoying and you end up paying twice because you’re going to have to get a quality set anyway. Saving money on your strings is just something that’s not a good investment.
Check out these Amazon links:
As you can see, learning how to change classical guitar strings is not that difficult after all. I admit, doing this the first time might take you a while longer. But after you get used to this, you can get it done in 10 minutes or less.
Tune in next time to learn how to change strings on an electric guitar. Once again, the process is a little different than for acoustic or classical guitars.


Tony
January 31, 2012 — 2:48 pm
Thanks for email,have not reicved chord book etc.
cheers
Tony
Carlos
February 10, 2012 — 1:29 am
Hey Tony, hasn’t the email with the ebook arrived yet? I can send it to you manually.